9 Tips on How To Take Pictures of Clothes To Sell Online

Looking to earn extra cash online by selling your second-hand clothes?
Or maybe you’re launching your own fashion brand and want to sell clothes on the internet?
Your photos will be crucial.
Here’s a step-by-step guide on how to take pictures of clothes that will definitely sell quickly.
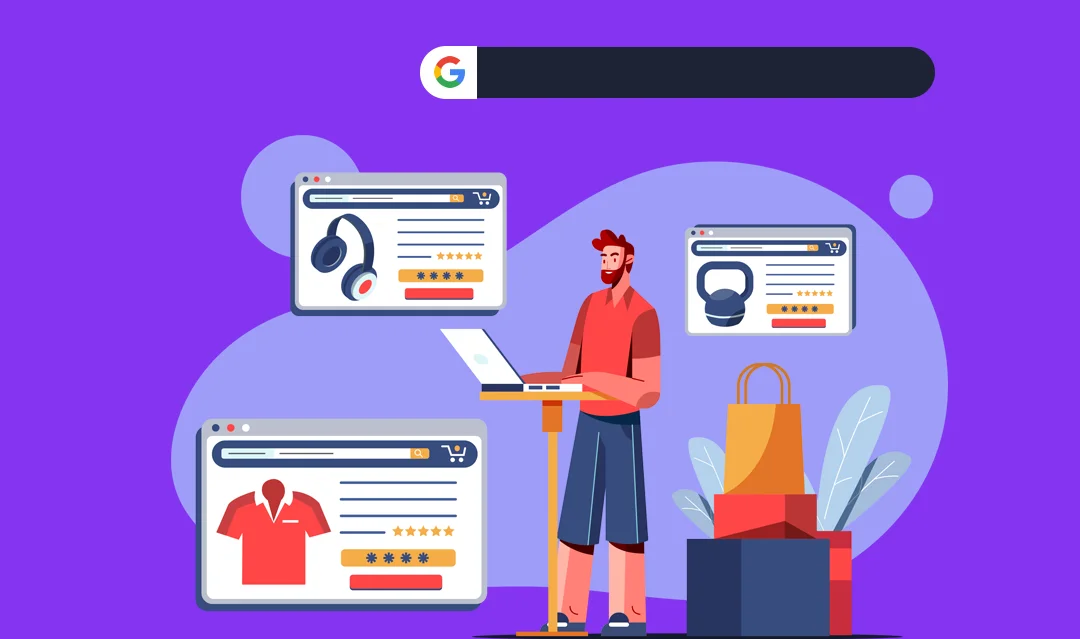
Selling clothes online has seen a significant rise recently, as more people turn to the internet for their fashion needs.
According to Statista, e-commerce sales for clothing and accessories reached around $205 billion in 2022.
This isn’t surprising, as fashion e-commerce accounts for about 23% of online sales in the US.
This shift to online shopping is reshaping retail in significant ways.
What Equipment Will You Require to Capture Clothing Photos?
Before you jump into shooting, make sure you have the right tools.
- Camera: While a professional-grade DSLR can produce quality images, a high-end smartphone’s camera will suffice for beginners.
- Lighting Equipment: Natural light is ideal. If this isn’t possible, invest in good quality lighting sets with diffusers.
- Tripod: A tripod brings stability to your images, resulting in sharp, clear photos.
- Background: Feature your clothes on either a flat nuetral toned background or a well-lit professional mannequin.
- Mannequin or Model: If using a mannequin, consider a ghost mannequin that allows for post-editing removal. Models add life to the photos but may require more coordination and cost.
- Image Editing Software: Basic understanding of software like Adobe Lightroom or Photoshop helps in post-production.
Here are some tips to help you take appealing pictures of clothing for online selling:
Complete Step by step Guide: Photographing Clothes for Selling
Taking pictures of clothing to sell can be intimidating, but with the right preparation and approach, you’ll have beautiful photos of your clothes in no time.
Here are several tips you should follow to take amazing clothing pictures.
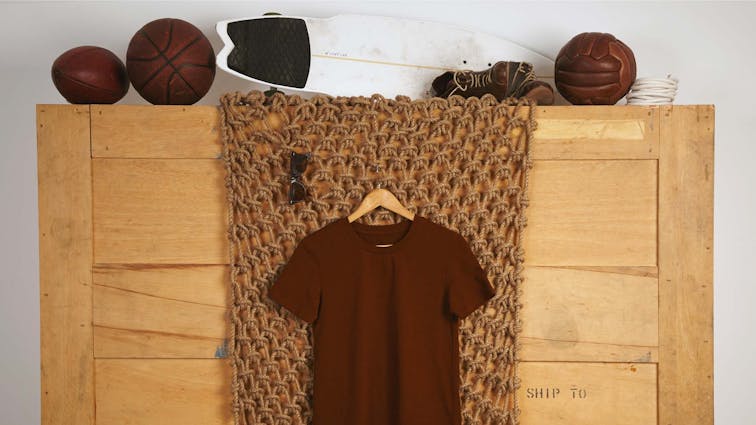
Step 1: Decide on the Type of Clothing Photography
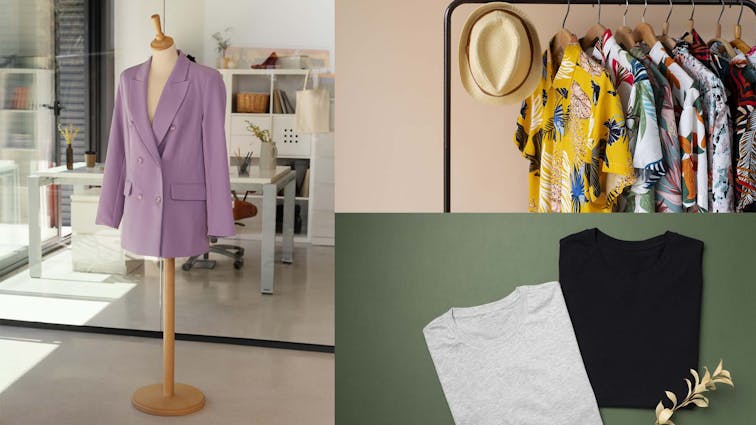
Choosing the right approach to clothing photography is vital. Here are the main types:
- Mannequin: Using a mannequin gives a 3D view of the clothing, showing how it fits on a body. It’s ideal for dresses, suits, and more complex garments. The downside is that it may require more setup and editing to remove the mannequin in post-processing.
- Hanger: This method is simpler and quicker than using a mannequin but may not display the clothing’s fit as effectively. It’s often used for shirts, jackets, and other items that hang well.
- Flat Lay: Popular on social media, flat lay photography lays the clothing on a flat surface, allowing for creative styling with accessories and props. It’s great for casual wear and accessories but may not show how the clothing fits on a body.
Step 2: Prepare Your Clothing Products

Presentation is key. Ensure the clothing items are clean, well-ironed, and free from wrinkles, lint, and other imperfections.
Use a steamer to remove stubborn wrinkles and a lint roller to eliminate stray fibers or dust.
If using accessories, ensure they complement the clothing without overpowering it.
The goal is to present the clothing as it would appear at its best to a potential buyer.
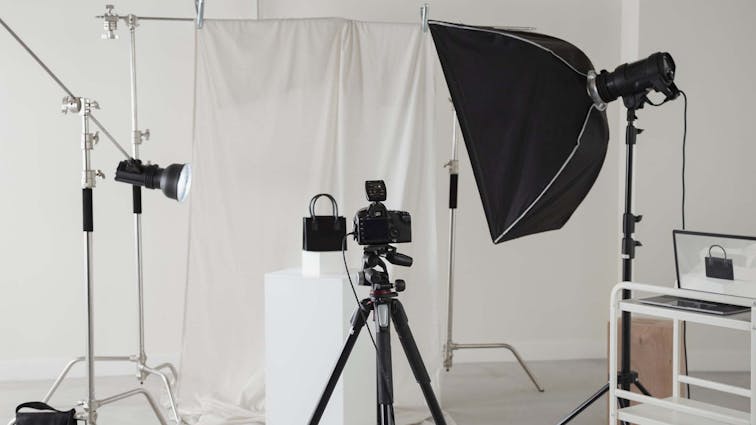
Step 3: Set up Your Photography Studio
A dedicated space ensures consistency:
- Space: Choose an area with good natural lighting or space to set up artificial lights. It should be clean and clutter-free.
- Backdrop: Hang or stretch the backdrop to avoid wrinkles. Ensure it complements the clothing.
- Lighting: Position lights to highlight the clothing’s texture and color. Use reflectors or foam boards to bounce light and eliminate shadows.
- Props: If using props, select ones that enhance the scene without distracting from the clothing. Less is often more.
Step 4: Check and Adjust Your Camera Settings
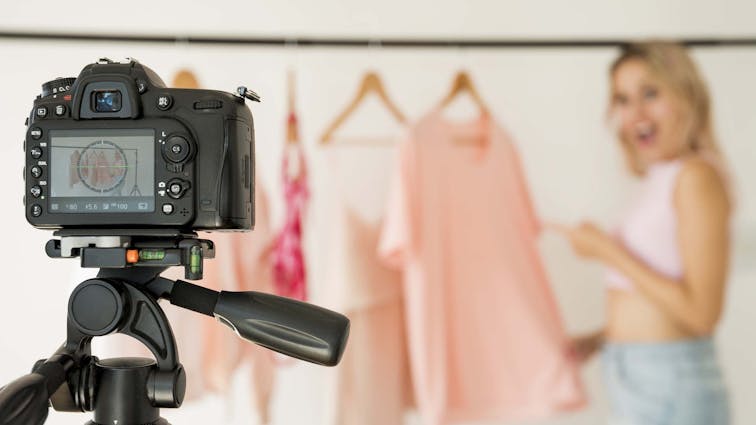
Understanding your camera’s settings is crucial:
- Aperture: Controls the depth of field. A wider aperture (lower f-number) blurs the background, focusing on the clothing.
- Shutter Speed: Affects motion blur. Use a faster shutter speed to freeze motion, especially if using a model.
- ISO Sensitivity: Adjust based on lighting. Lower ISO for bright conditions, higher ISO for low light. Be mindful of noise at higher ISO levels.
- White Balance: Match the white balance to your light source to ensure accurate color representation.
RELATED: Best Ecommerce Platform for selling Clothing: A Comprehensive Guide.
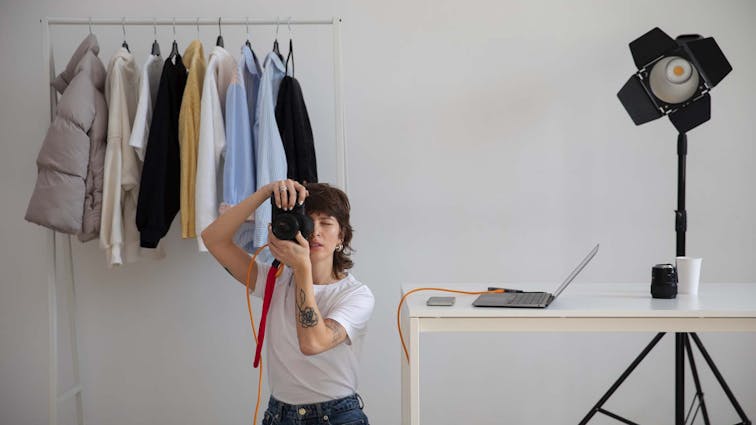
Step 5: Start Taking Your Product Photos
Now it’s time to shoot:
- Angles: Capture various angles to showcase different features, including front, back, sides, and close-ups of details.
- Composition: Frame the clothing to highlight its shape and design. Consider the rule of thirds for a pleasing composition.
- Focus: Use manual or auto-focus to ensure the clothing is in sharp focus, especially on key details like textures, patterns, or logos.
Step 6: Consistency
Maintain consistency in your photography style. This creates a cohesive and professional look throughout your product listings.
Consistency can be achieved in several ways:
- Lighting: Use the same lighting setup for all your products to ensure uniformity in brightness, shadows, and color temperature.
- Backdrop: Stick to the same background color or texture to create a seamless look across all your listings.
- Framing and Composition: Keep the framing and composition consistent, such as always centering the item or using the same aspect ratio.
- Editing Style: Apply the same post-processing techniques, such as color correction, cropping, and retouching, to maintain a uniform appearance.
Consistency not only enhances the visual appeal of your online store but also conveys professionalism and attention to detail.
It helps customers navigate your products more easily and creates a recognizable brand image.
Step 7: Edit Your Product Photos to Enhance Their Appeal

Post-processing enhances your photos:
- Color Correction: Ensure the colors are true to life. Adjust saturation, contrast, and brightness as needed.
- Background Removal: Use tools like Photoshop to create a consistent background across all product photos.
- Cropping: Frame the clothing to create a visually pleasing composition. Consider standard aspect ratios for consistency across your online store.
- Retouching: Remove any stray threads, lint, or imperfections that might have been missed during preparation.
Step 8: Label and Care Instructions
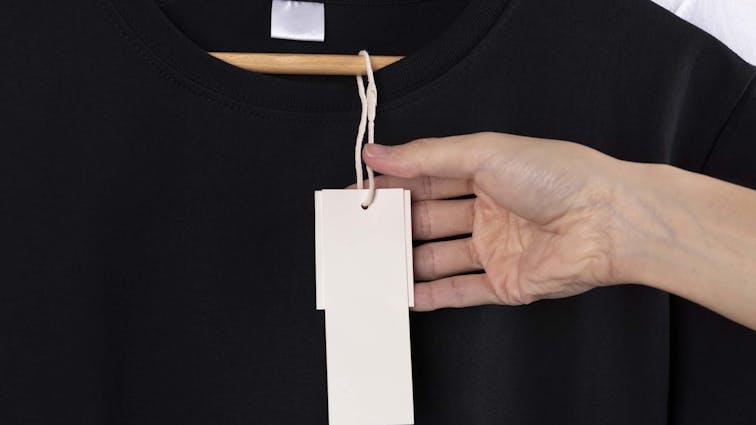
Including a picture of the clothing’s label and care instructions can add authenticity and transparency to your listing.
Buyers often want to know the fabric content, brand, size, and care instructions before making a purchase.
By providing clear and detailed images of these aspects, you not only build trust but also reduce the likelihood of returns or dissatisfaction.
Consider using a macro lens or a close-up setting on your camera to capture these details clearly.
Step 9: Multiple Images
Provide multiple images of each item, showcasing different angles, close-ups, and details. This helps buyers feel more confident about their purchase. Consider including:
- Front and Back Views: Show the overall design and fit.
- Side Views: Highlight the shape and silhouette.
- Close-ups: Focus on unique details like embroidery, buttons, or special stitching.
- Styled Shots: If applicable, show the item styled with accessories or other clothing to inspire potential buyers.
By offering a variety of images, you give buyers a virtual “try-on” experience, allowing them to visualize how the item might look and fit.
This comprehensive approach can enhance the buyer’s understanding of the product and increase the likelihood of a successful sale.
Ready to Start Your E-Commerce Clothing Brand?

In the rapidly evolving world of online fashion retail, ensuring your product photos are top-notch is just one piece of the puzzle.
The platform on which you showcase these photos and manage your e-commerce operations is equally crucial.
Enter Aasaan, a no-code, API-first e-commerce platform designed to help businesses build next-generation shopping experiences visually.
With Aasaan, not only can you create stunning online stores in minutes, but you can also enjoy benefits such as:
- Lightning-Fast Site Speed: Experience a 70% increase in site speed, ensuring a seamless shopping experience for your customers.
- Boosted Conversion Rates: Witness a remarkable 38% uplift in conversion rates, maximizing your sales potential.
- Elevated Average Order Value: Enjoy a 20% surge in average order value, driving higher revenue per transaction.
- Accelerated Time to Market: Achieve 10x faster time to market, enabling you to stay ahead of the competition.
Moreover, Aasaan offers seamless integrations, empowering you to expand the capabilities of your online store with tools you love.
Whether you’re starting from scratch or integrating with your existing backend, Aasaan provides a comprehensive solution to scale your e-commerce clothing brand.
So, if you’re looking to elevate your e-commerce clothing brand and provide a unique shopping experience for your users, start with Aasaan.
With its intuitive drag & drop storefront builder and a plethora of features tailored for modern e-commerce needs, Aasaan makes the journey of online selling truly ‘easy’.
Conclusion:
In the competitive landscape of online fashion retail, the quality of your product photos plays a pivotal role in attracting and engaging potential buyers.
From selecting the right equipment and preparing the clothing items to maintaining consistency and addressing common customer questions, every step in the process contributes to creating professional and appealing images.
This comprehensive guide has walked you through the essential steps to master the art of clothing photography.
By following these guidelines, you can present your products in the best possible light, enhancing your online store’s appeal and boosting sales.
Whether you’re looking to earn extra cash by selling second-hand clothes or launching a fashion brand, these techniques will help you stand out and succeed in the digital marketplace.
Remember, your photos are more than just visual representations; they are your virtual storefront, conveying the quality, style, and authenticity of your products. Invest time and effort in getting them right, and watch your sales soar.
Good luck, and we hope your clothing items lead the fashion pack! Happy Selling!
FAQ’s:
1: Do I need expensive equipment to take photos for my online clothing store?
No, expensive equipment is not necessary to take quality photos for your online clothing store. While professional cameras can provide excellent results, many modern smartphones, including iPhones, have advanced camera features that can capture high-quality images. Investing in good lighting and using a tripod can further enhance your photos without a significant investment.
2: How do I take good pictures of clothes with an iPhone?
Taking good pictures of clothes with an iPhone is achievable with some attention to detail. Use a clean and neutral background, ensure good lighting (natural light is often best), and utilize the iPhone’s portrait mode for depth effect. A tripod can help with stability, and editing apps can enhance the final image. Experiment with different angles and close-ups to showcase the clothing effectively.
3: What is the best way to photograph clothes to sell?
The best way to photograph clothes to sell involves proper preparation and technique. Ensure the clothes are clean and wrinkle-free, use a neutral background, and provide consistent lighting. Capture multiple angles and details, and consider using a mannequin or model to show fit. Editing can enhance the final images. Consistency in style and presentation across all products creates a professional appearance.
4: Do I need a model for my clothes?
While using a model can showcase how clothes fit and add a human element to your photos, it’s not a requirement. Mannequins, hangers, or flat lay photography can also effectively present clothing. The choice depends on your brand’s style, the type of clothing, and your budget.
5: How many photos should I take of each item?
It’s advisable to take multiple photos of each item to provide a comprehensive view. Include front and back views, side angles, close-ups of details, and, if possible, a styled shot. Providing around 5-10 images per item can help customers get a full understanding of the product, increasing confidence in their purchase decision.
Pixelcut is an AI-powered photo editing platform that makes it easy for users to create stunning images and graphics quickly and efficiently. It offers a range of tools to help users remove backgrounds, edit photos, and create designs for online stores and other digital platforms.
Features
Pixelcut offers a range of features to help users create high-quality images and graphics, including:
- AI-powered background removal: Pixelcut’s AI-powered platform can remove backgrounds from images quickly and accurately, making it easy to create product photos and other images for online stores .
- Photo editing tools: Pixelcut provides users with a range of photo editing tools, including filters, cropping, and color correction.
- Design templates: Pixelcut offers a range of design templates to help users create graphics and designs quickly and easily.
- Mobile app: Pixelcut offers a mobile app, making it easy to edit photos and create graphics on-the-go.
Pricing
Pixelcut offers a range of pricing plans to suit different business needs. The plans are as follows:
- Free plan: The free plan includes basic features such as background removal and limited editing tools.
- Premium plan: The premium plan costs $10 per month and includes advanced features such as unlimited background removal, additional editing tools, and access to design templates.
Note that the pricing and features are subject to change, and it’s always recommended to check the latest information on the official website of Pixelcut.
10. Copysmith
Copysmith is an AI-powered copywriting platform that provides users with a range of tools to create content quickly and efficiently. It can write engaging content in any language and on any topic , making it a useful tool for businesses and individuals who need to create a lot of content quickly.
Features
Copysmith offers a range of features to help users create high-quality content, including:
1. AI-Powered Copywriting: Imagine a platform that can write engaging content in any language, on any topic. Copysmith’s AI-powered engine makes it possible, turning content creation into a breeze.
2. Content Optimization: SEO is no longer a mystery with Copysmith. It provides tools to optimize content for search engines, ensuring that your content doesn’t just exist; it excels.
3. Product Description Writing: Crafting compelling product descriptions is an art, and Copysmith is the skilled artist. It’s a tool designed to make your eCommerce platforms shine.
4. Collaboration Tools: Teamwork makes the dream work, and Copysmith knows it. With collaboration tools, it brings team members and clients together, fostering creativity and efficiency.
5. Integration with Other Tools: Compatibility is key, and Copysmith integrates with tools like Shopify and Google Chrome, streamlining the content creation and management process.
Pricing
Copysmith offers a range of pricing plans to suit different business needs. The plans are as follows:
- Starter plan: The starter plan costs $19 per month and includes basic features such as AI-powered copywriting and content optimization.
- Professional plan: The professional plan costs $59 per month and includes advanced features such as product description writing and collaboration tools.
- Enterprise plan: The enterprise plan is designed for larger businesses and offers custom pricing based on business needs.
Note that the pricing and features are subject to change, and it’s always recommended to check the latest information on the official website of Copysmith.
Final Thoughts!
AI tools have transformed online shopping, empowering businesses to enhance customer experiences, streamline operations, and drive growth.
From personalized suggestions to improved customer support and advanced search features, AI has fundamentally reshaped the world of online retail.
By using AI-driven recommendation systems, businesses can boost engagement, conversions, and overall customer satisfaction.
Quick assistance is ensured with AI-powered customer service tools, and seamless shopping experiences are facilitated through advanced search capabilities.
Looking ahead, the potential of AI tools in e-commerce is even more promising. Adapting to emerging trends will provide a competitive edge, propelling continuous expansion.
The showcased AI tools in our blog empower e-commerce businesses to deliver personalized experiences that stand out. Embrace the possibilities, adapt to the changing landscape, and embark on your journey to e-commerce excellence, all powered by AI!
We hope you’ve enjoyed exploring these tailored tools for your store!
FAQs (Frequently Asked Questions):
1. What is AI and how is it used in ecommerce?
AI refers to the use of algorithms and machine learning to simulate human intelligence. In ecommerce, AI is used for personalized recommendations, customer support, fraud detection, and more.
2. What are the benefits of using AI in the ecommerce industry?
AI offers improved customer experience, increased sales, enhanced efficiency, and reduced costs in the ecommerce industry.
3. What are some popular AI tools and technologies used in ecommerce?
Popular AI tools in ecommerce include customer segmentation, visual search, voice search, predictive analytics, and fraud prevention.
4. How can AI optimize various aspects of ecommerce operations?
AI can optimize ecommerce operations by personalizing customer interactions, automating tasks, predicting trends, and preventing fraud.